Fusion Fluids Drawer Removal and Replacement

|
Note—A Firmware Installation procedure must be performed when replacing a module or PCB. |
Required Materials and Tools
- FSE Tool Kit
- Bench Top Pads
- Fusion Fluids Drawer Module
Time Required
45 Minutes
Fusion Fluids Drawer Removal Procedure
- Put on proper PPE.
- Shut down the Panther System and PC.
- Remove all fluid packs from Fusion Fluids Drawer.
- Remove the Front Panel.
Refer to the Front Panel Removal and Replacement procedure. - Remove the Tip Drawers.
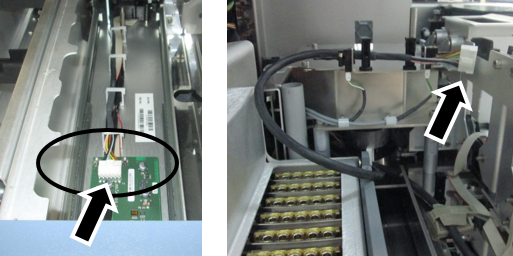
Refer to the Tip Drawers Removal and Replacement procedure. - Fully open the Fluids Drawer to access the PCB.
 Disconnect the CAN cable.
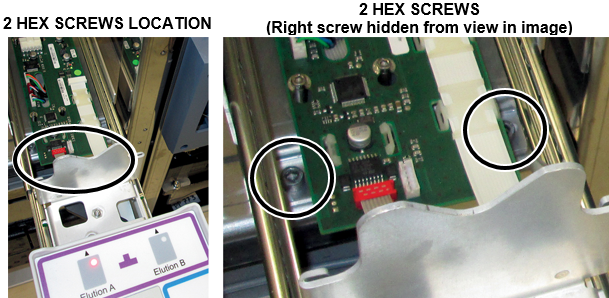
Open all the cable clips and gently pull the CAN cable completely out of the back of the drawer. - With the Fluids Drawer fully open, remove the two hex screws (4mm hex key) that secure the front of the Fluid Drawer to the chassis.
(Screws are located between the railing and the PCB on the bottom of the drawer.)
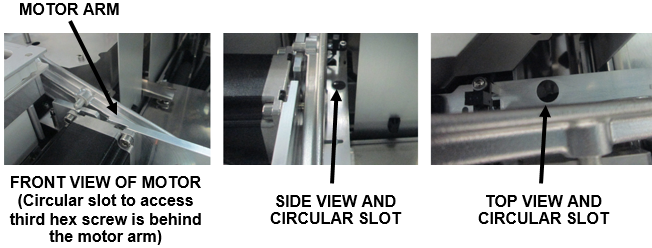
Close the Fluid Drawer. - Loosen (do not remove) the third hex screw (4mm hex key) located through a circular slot behind the Elution Buffer Transfer Arm motor. Reach behind the motor and feel for the opening.
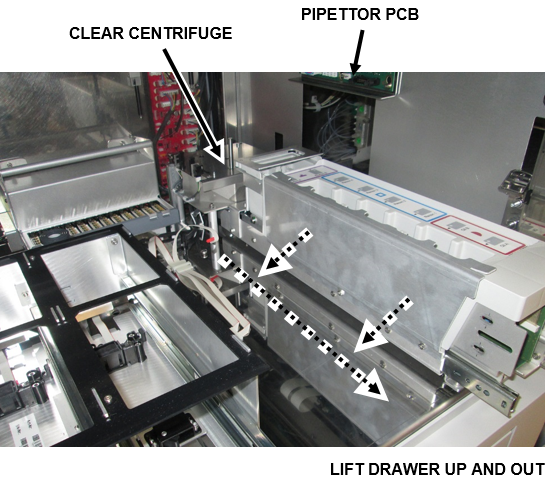
- Remove the Fluids Drawer and place on a flat workspace covered with bench pads.

Caution—When removing the Fluid Drawer take care not to damage the Pipettor PCB on the side of the chassis. - Slide the entire drawer assembly forward 2 inches, no more, so the back of the Fluids Drawer is clear of the Centrifuge module.
- Place one hand under the front of the drawer, one hand under the Transfer Arm motor in the back.
- Gently raise and move the Fluids Drawer to the left. Slightly twist or turn the drawer to guide the motor out of the Panther side.
- Carefully remove the drawer out the front of the system when the Transfer Arm motor is clear of the Panther.
Fusion Fluids Drawer Replacement Procedure
- Reverse the Removal Procedure.
- Replace the Tip Drawers.
Refer to the Tip Drawers Removal and Replacement procedure. - Replace the Front Panel.
Refer to the Front Panel Removal and Replacement procedure.
Verification
- Power on the Panther System and PC.
- Through Service Software, verify that all the Front Cover LEDs and drawer locks are working properly.
- Load firmware to the new Fusion Fluids Drawer module.
Refer to Panther Fusion System Installation > Run Instrument Setup (Fusion). - Teach the Panther Reagent Pipettor to the Elution Tub.
Refer to Service Procedures > Panther System Pipettor Teaching. - Teach the Fusion Pipettor (right) to the Fusion Fluid Drawer.
Refer to Service Procedures > Panther Fusion System Pipettor Teaching. - Verify that the RFID antennas are working properly.
- Perform a Panther Fusion System OQ Test.
Refer to Service Procedures > Panther Fusion System OQ Test.- 7 cycles
- Check the Initialize, Report and Elution Bottle checkboxes ONLY
Do NOT select MTUMulti-tube unit—Container used to process tests in the instrument. An MTU contains five separate reaction tubes. The MTU is moved through the instrument by the linear distributor and includes five tiplets for pipettiing to be used in the mag wash station. or PCR cartridges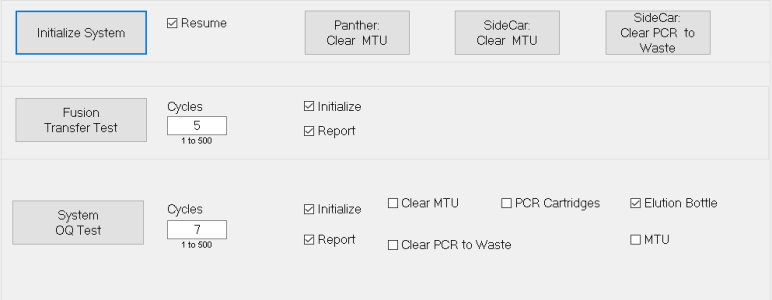
 button at the top of the page to send feedback, comments, or change requests.