Imaging the Panther System XE2 Workstation
Parts and Materials Required
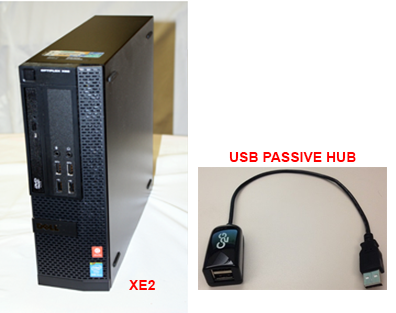
- Dell OptiPlex XE2 PC
- USB 2.0 2-Port Passive Hub [CBL-02158], for systems 01404 and lower
- [CMP-0633] RAM Upgrade, 8GB, Quantity 2, required if installing Win 10 image
- Panther Image
- Vista, Panther Image for OptiPlex XE2
OR
- Windows 7, Panther Image for OptiPlex XE2
OR
- Windows 10, Panther Image
Time Required
- LCD monitors were installed on Panthers 1404 and lower.
- LED monitors are installed on Panthers 1405 and higher.
- The Dell OptiPlex XE2 contains updated USB drivers which impact LCD monitor touch-screen functionality. To enable the LCD touch-screen to function properly, a USB 2.0 2-port passive hub is needed.
- LED monitors do not require the USB 2.0 2-port passive hub. The four possible monitor configurations are listed below.
- XE + LCD Monitor → No Hub
- XE + LED Monitor → No Hub
- XE2 or XE3 + LCD Monitor → will need the Hub
- XE2 or XE3 + LED Monitor → No Hub
- The Dell OptiPlex XE2 contains upgraded hardware. As a result, new images have been created specifically for the OptiPlex XE2.
- Noticeable changes to the OptiPlex XE2 image include:
- It is no longer required to configure the system to a 24-hour time format from a 12-hour time format. The image is configured by default with a 24-hour time format. If needed, the time can be adjusted back to 12 hour format.
- The HP 6100 and 8100 printer drivers are installed on the system. Installation instructions for HP Officejet 6100 or HP Officejet Pro 8100 Printer are no longer needed when installing the HP 6100/8100 printers on systems with the Dell OptiPlex XE2 PC.
- Scheduled defragmentation is now disabled on XE2 PCs as default.
- If the existing database on an old Optiplex XE needs to be transferred to the new XE2, follow the Database Backup and Restore procedure.
- Power down the Panther instrument and PC.
- Unplug the network cable from the back of the PC.
- If installing a Windows 10 image for SW 7.1.5 (or higher), follow the instructions for Installing Image v6.
- If installing Windows 7 (or lower), proceed to the next step.
- Turn on PC and press F12 on the keyboard when prompted to get to the Boot Options.
The Boot Device Menu screen appears.
If the Boot Device Menu is locked, complete the following procedure to unlock it:
- Tab to highlight the Unlock button.
- Press Enter.
- Enter gpservice in the input field.
- Press Enter.
- Insert the applicable Workstation Image Deployment Tool CD into the CD ROM drive.
- Select Onboard or USB CD-ROM Drive on the Boot Device Menu.
- Perform this step and the next step promptly because the following prompt displays for a short time (approximately 5 seconds). Press Enter.
- Press any key when prompted to Press any key to Boot from CD.
A Windows is loading file message screen with a progress bar appears (about 1 minute).
A Starting Windows message screen appears.
- Clear the check box to remove the default location of the image.
- Select the applicable radio button for the operating system, Windows Vista or Windows 7.
- Press the Start Recovery Process button.
- Select the Product Image file, usually a *.wim file (for example, ProdImage-3_0_11DriveC.wim for Vista).
- Select Open.
The system restores the image. This takes approximately 26 minutes to complete.
 | Note — The elapsed time dialog box shows progress for the first 12 minutes. The Status Progress scroll bar shows the remaining progress. |
- Select Reboot when the process completes.
- An Installing device driver software message appears in the lower right corner of the screen.
- A Microsoft Windows dialog box appears indicating, You must restart your computer to apply these changes.
- Select Restart Now.
- Verify that the image was installed correctly.
- Using Windows Explorer, navigate to C:\Panther\ and identify the version file.
- Verify that the Image Version is x.x.x ( for example, Image Version 5.7.1)
- Remove the Workstation Image Deployment Tool CD.
| |
|
Note — This section only applies to Panther System S/N 1404 or lower. It does apply to both Windows 7 and Windows 10. |
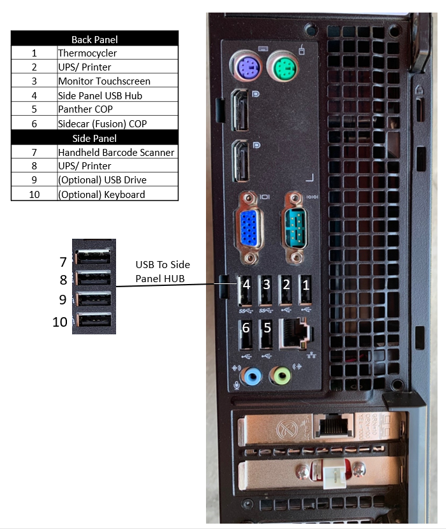
- Identify the cable marked with an "M" in the USB cables that plug into the computer.
- If the cables are not labeled, proceed with the following steps.
- Once the PC has booted to Windows
 click on the Start menu. Right-click on Computer and select Manage.
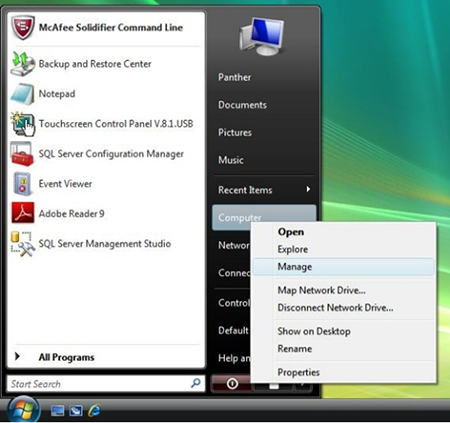
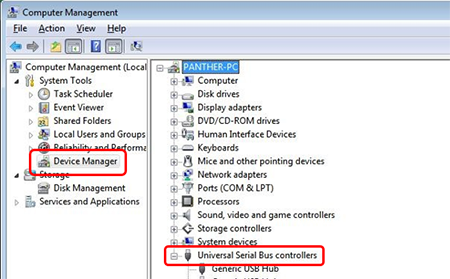
- The Computer Management window will be displayed. Select Device Manager in the left-hand pane.
- Expand the Universal Serial Bus controllers section.
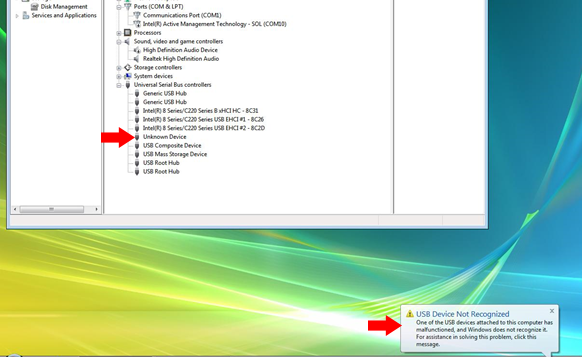
- To identify which USB cable is connected to the monitor, unplug all the USB cables then plug them back in one at a time.
- The USB cable connected to the monitor will display as Unknown Device.
- You will briefly see a USB Device Not Recognized message displayed on the taskbar.
- With the monitor USB cable identified, shutdown the PC.
- Unplug the monitor USB cable, and using tape, clearly label the cable for future reference. Then connect the monitor cable to either port of the 2-Port Passive Hub [CBL-02158].
- Connect the 2-Port Passive Hub to any USB port on the rear of the PC.
- Re-connect all other USB cables to the PC.
- Power on the Panther PC and verify the monitor touch-screen is functional.
BIOS Configuration
- Proceed to the next step, BIOS Configuration Procedure.
Click the  button at the top of the page to send feedback, comments, or change requests.