Pipettor cLLD & bLLD Test Procedure
Parts and Materials Required
- Consumables (MTUs and Disposable Tips)
- Tap water
- Manual pipettor (from customer site, to measure tap water)
Time Required
Procedure
Screenshots are for reference only. Your screen may vary.
First complete the test, then repeat the procedure selecting bLLD.
cLLD tests the capacitive circuit. bLLD will show wear in the piston drive.
For information on bLLD vs cLLD, read Barometric vs Capacitive Liquid Level Detection
- Power on the Panther System and PC.
- Start Service Software.
- Setup a cLLD AND bLLD Test on the Sample Pipettor (Right Arm).
First complete the cLLD test, then repeat the procedure selecting bLLD.
- Fill each tube of an with approximately 200 µL of tap water.
(If available use a manual pipettor from customer site for accuracy)
- Insert the MTU into the Sample Dispense Slot.
(Insert manually or use Service Software and the Service Queue.)
- Load 1 full tip tray in the left Tip Drawer, Position 1 (back left).
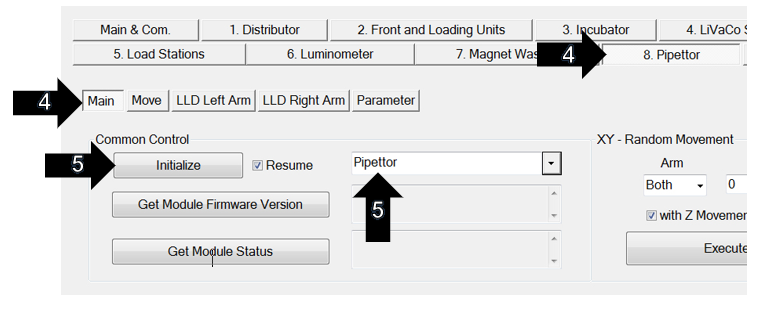
- Click on the Pipettor tab and select Main.
- Select Pipettor from the dropdown and click Initialize.
- Perform the cLLD AND bLLD test on the Sample Pipettor (Right Arm).
First complete the cLLD test, then repeat the procedure selecting bLLD.
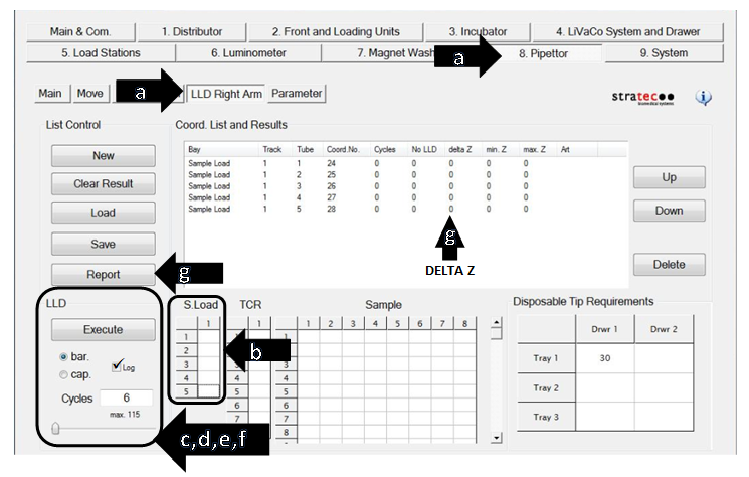
- On the Pipettor tab select LLD Right Arm.
- In the S. Load section, double-click each square (1-5) to add all 5 tubes to the Coord. List.
- In the LLD section, enter “6” cycles.
- For a cLLD test, select the cap. bubble and check Log
- For a bLLD test, select the bar. bubble and check Log
- Click Execute. (Click OK in the “Delete Results?” window.)
- To pass, the Delta Z values must be less than 30.
Save each passing test report (C:\Panther\Panther Service Software\Log\Reports\LLD).
If the test does not pass, refer to Step 7.
-
If the cLLD test on the Pipettor does not pass, try the following:
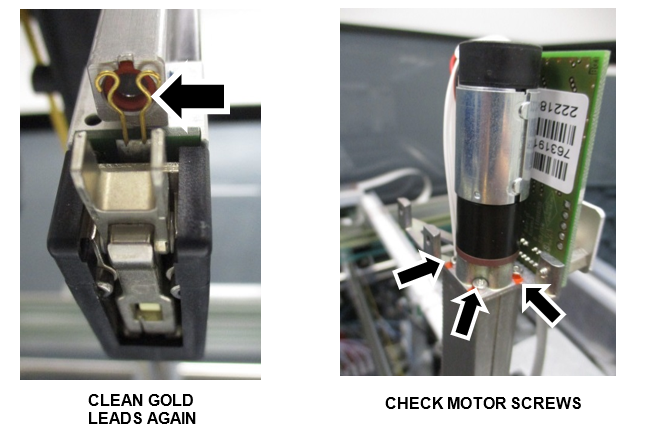
- Clean the Pipettor's gold leads
- Gently squeeze the leads together (fingers only) to improve contact with the DiTi.
- Turn off instrument and inspect the three Pipettor Pump motor screws for tightness
(Pump motor at the top of the pipettor, requires 1.5 mm hex driver).
Ensure instrument is off, as there is a possibility of shorting the board when accessing the screws.
- Re-run the cLLD test. If the test still does not pass, replace the pipettor.
Make sure to perform the Z-Motor Mesh Tool Procedure when replacing the pipettor.
- Run the Pipettor Pressure Integrity Test and attach the report to the UCR.
Remember that any value above 0.33 is now accepted as a passing test for the Pipettor Pressure Integrity.
- Power on the Panther System and PC.
- Start Service Software.
- Setup a cLLD AND bLLD Test on the Left Arm.
First complete the cLLD test, then repeat the procedure selecting bLLD.
- Fill one empty reagent Enzyme bottle (100 test kit) with approximately 1 mL of tap water.
(If available use a manual pipettor from customer site for accuracy)
An Enzyme bottle from an FSE Flashcheck kit can be used.
- Place the Enzyme bottle in the Enzyme slot of a reagent rack and slide into Lane 1 of the Reagent Bay.
- Load 1 full tip tray in the left Tip Drawer, Position 1 (back left).
At least 30 tips are required.
- From the Pipettor tab select Main.
- Select Pipettor from the dropdown and click Initialize.
- From the dropdown, select Reagent Module and click Initialize.
- Perform the cLLD AND bLLD test on the Reagent Pipettor (Left Arm).
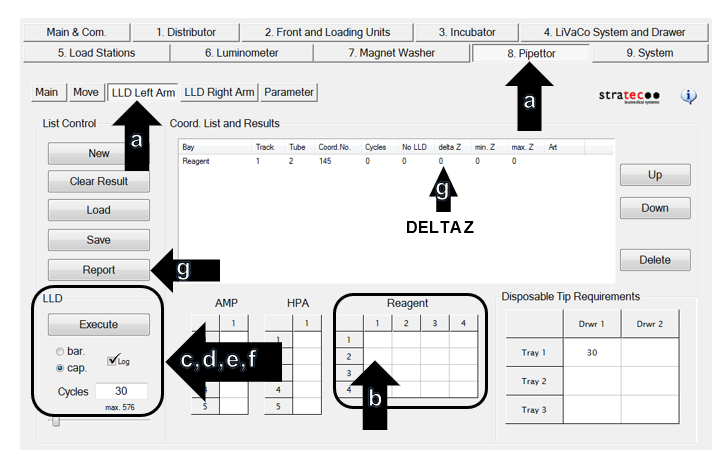
First complete the cLLD test, then repeat the procedure selecting bLLD.- On the Pipettor tab select LLD Left Arm.
- In the Reagent section, double-click the Lane 1, Position 2 square to add the bottle to the Coord. List.
-
In the LLD section, enter “30” cycles.
-
For a cLLD test, select the cap. bubble and check Log
-
For a bLLD test, select the bar. bubble and check Log
-
Then click Execute. (Click OK in the “Delete Results?” window.)
- To pass, the Delta Z values must be less than 30.
Save each passing test report (C:\Panther\Panther Service Software\Log\Reports\LLD).
If the test does not pass, refer to Step 8.
-
If the cLLD test on the Pipettor does not pass, try the following:
- Clean the Pipettor's gold leads
- Gently squeeze the leads together (fingers only) to improve contact with the DiTi.
- Turn off instrument and inspect the three Pipettor Pump motor screws for tightness
(Pump motor at the top of the pipettor, requires 1.5 mm hex driver).
Ensure instrument is off, as there is a possibility of shorting the board when accessing the screws.
- Re-run the cLLD test. If the test still does not pass, replace the pipettor.
Make sure to perform the Z-Motor Mesh Tool Procedure when replacing the pipettor.
- Run the Pipettor Pressure Integrity Test and attach the report to the UCR.
Remember that any value above 0.33 is now accepted as a passing test for the Pipettor Pressure Integrity.
- Power on the instrument and PC.
-
Start Service Software.
-
Setup a cLLD AND bLLD Test on the Panther Fusion Pipettor.
First complete the cLLD test, then repeat the procedure selecting bLLD.
- Insert a Reconstitution Buffer Fluid pack in one of the four positions available.
-
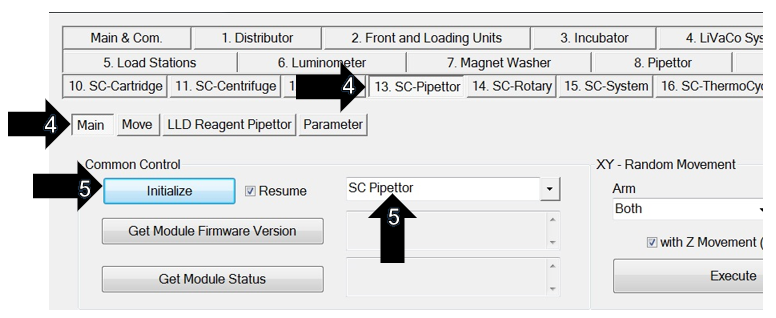
Click on the SC-Pipettor tab and Select Main.
-
Select SC Pipettor from the dropdown and click Initialize.
- Perform the cLLD AND bLLD test on the SC Pipettor (Front Arm).
First complete the cLLD test, then repeat the procedure selecting bLLD.
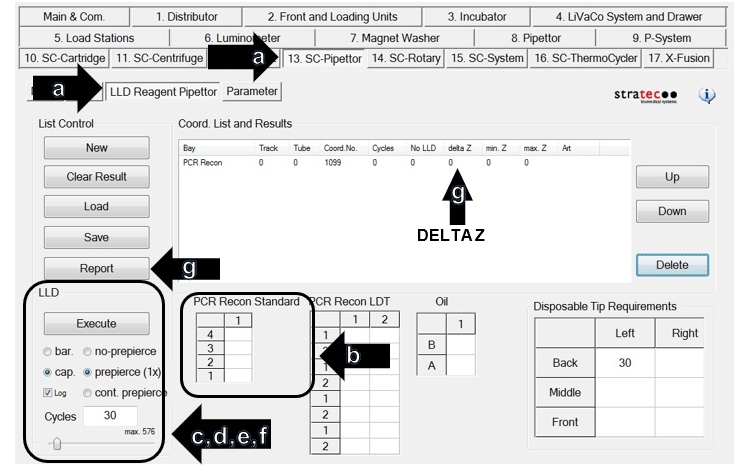
- On the SC-Pipettor tab select LLD Reagent Pipettor.
-
Under PCR Recon Standard double click the position where the Reconstitution Buffer bottle was previously inserted.
-
In the LLD section, enter “30” cycles and select “prepierce (1x)”.
- For a cLLD test, select the cap and check Log
-
For a bLLD test, select the bar and check Log
-
Click Execute. (Click OK on the “Delete Results?” window that appears.)
- To pass, the Delta Z values must be less than 30.
Save each passing test report (C:\Panther\Panther Service Software\Log\Reports\LLD).
If the test does not pass, refer to Step 7.
-
If the cLLD test on the Pipettor does not pass, try the following:
- Clean the Pipettor's gold leads
- Gently squeeze the leads together (fingers only) to improve contact with the DiTi.
- Turn off instrument and inspect the three Pipettor Pump motor screws for tightness
(Pump motor at the top of the pipettor, requires 1.5 mm hex driver).
Ensure instrument is off, as there is a possibility of shorting the board when accessing the screws.
- Re-run the cLLD test. If the test still does not pass, replace the pipettor.
Make sure to perform the Z-Motor Mesh Tool Procedure when replacing the pipettor.
- Run the Pipettor Pressure Integrity Test and attach the report to the UCR.
Remember that any value above 0.33 is now accepted as a passing test for the Pipettor Pressure Integrity.
 button at the top of the page to send feedback, comments, or change requests.