Thermocycler Removal and Replacement
| |

|
Note—A Firmware Installation procedure must be performed when replacing a module or PCB. |
Parts and Materials Required
- FSE Tool Kit
- Bench Top Pads
- Thermocycler Module
Time Required
Thermocycler Removal Procedure

|
WARNING— Caps and Vials may be present in the Thermocycler. It is necessary to remove ALL Caps and Vials to avoid contamination. |
- Put on proper PPE.
- Visually inspect the thermocycler for caps and vials. If there are caps/vials that need to be removed perform Steps 3 through 5. If not, go to Step 6.
- Start Service Software.
 From the 15. SC-System tab, select OQ-Test, then click Initialize SC-System.
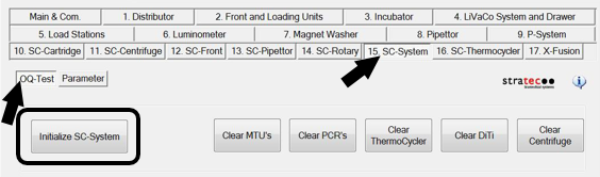
- Click Clear Thermocycler.
Allow the System to clear any caps & vials from the Thermocycler.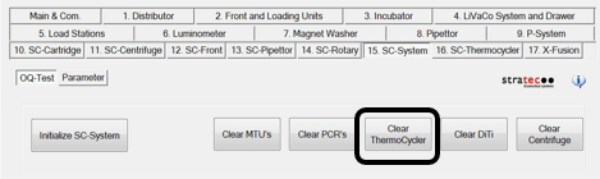
- Shut down the System and PC.
| Caution—Power must be turned off before removing the thermocycler. |
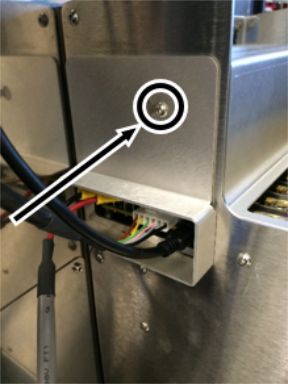
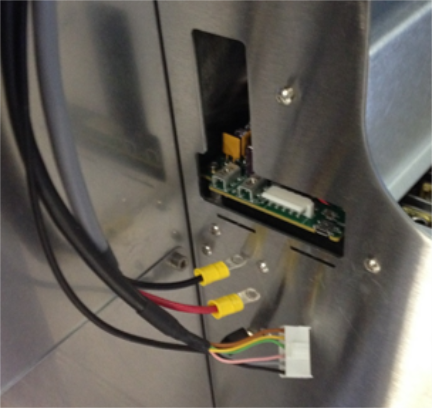
- Remove the connector shroud.
Loosen the screw with a 2.5 mm hex key, slide cover towards the front of the system, and pull lower tabs out of slots to expose the power, CAN, and micro-USB cable connections. | Important—Do NOT discard shroud, shroud needs to be returned with TC. if shroud is used with new TC, create OBF case and fill out OBF form. |
- Using the power quick-connect, disconnect the power cable to the Thermocycler.
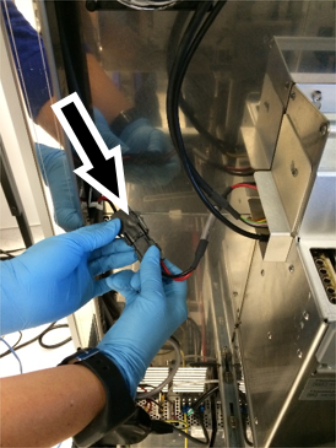
| Note—Some Thermocyclers may not have the quick-connect installed. The power cable can be removed by using a Phillips-head screwdriver to remove the (red and black) terminal screws (retain the screws for re-installation). |
- Disconnect the CAN and mini-USB cables connections from the Thermocycler.
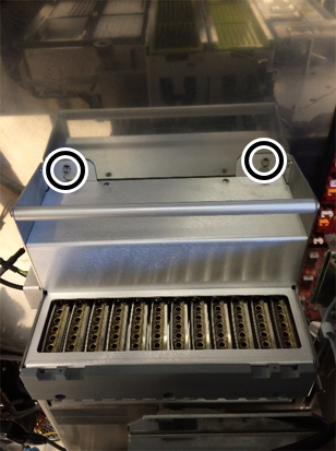
- Using a 4mm hex driver, loosen (not necessary to remove) the two screws securing the Thermocycler to the rear of the chassis.
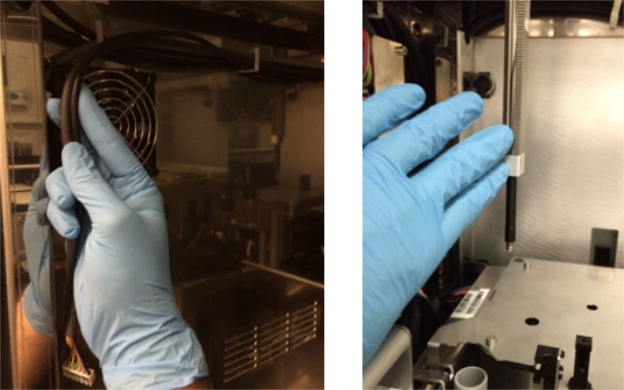
- Make sure that communication cables, power cable, and both Pipettor arms are clear from the area above the Thermocycler. Move the pipettors as far to the front right side of the system as possible.
- Grasp the Thermocycler’s handle and lift up and out to remove the module (screws pass through keyhole slots). Remove the Thermocycler from the left side of the Fusion.
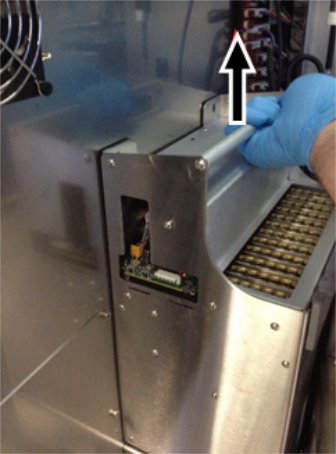
- Place the Thermocycler module on a sterile benchtop pad.
| Important—Put shroud back on TC if shroud is used with new TC, create OBF case and fill out OBF form. |
Thermocycler Replacement Procedure
- Reverse the Removal Procedure.
| Note—When placing the Thermocycler module back into the system, make sure that the slots in the lower rear panel of the module have slid onto the T-shaped mounting pins on the back of the Fusion chassis. |
- When re-connecting the power, remove the short power cable with the quick-connect on the end from the old thermocycler, and install the quick-connect on the new thermocycler. Reinstall the (red and black) terminal screws on their respective terminals using a Phillips screwdriver.
| IMPORTANT—It is CRITICAL that the power connection is correct. The black (ground) wire attaches to the rear terminal using the black terminal screw. The red (positive 24V) wire attaches to the front terminal using the red terminal screw. The Thermocycler that was removed and being returned should be shipped with the original terminal screws reinstalled in their respective positions. |
| Note—If the thermocycler did not have the quick-connect power cable, just reattach the power connections (red and black) directly back to the correct terminals. |
Verification
- Power on the system and PC.
- Set instrument setup as stated in service manual.
For Thermocycler replacement only "IS_Config_SideCar.xml" needs to be run.
- Load firmware to the new Thermocycler module. (Time estimate: 30 minutes)
Refer to Panther Fusion System Installation > Run Instrument Setup (Fusion).
- Teach the Vial Robot to the Thermocycler module. (Time estimate: 15 minutes)
Refer to Service Procedures > Panther Fusion System Pipettor Teaching.
- Perform a Sidecar Pipettor OQ Test. (Time estimate: 10 minutes)
Refer to Service Procedures > Side Car Pipettor OQ Test.- When using Service Software v4.0.7.0 (System SW 6.x):Click Me!
- Check Report and Initialize
- Check Cap & Vial
- Enter 10 Cycles
- Select Cap & Vial tray location
- Save report and remove any used partial tray(s) when complete.
- When using Service Software v5.0.12.0 (System SW v7.x:
- Check Report and Initialize
- Check Cap & Vial
- Single Tray
- Save report and remove any used partial tray(s) when complete.
- Perform cleaning using automated or manual method. (Time estimate: 10 - 30 minutes)
| Note—As TC is new from factory, no preliminary ssw scan is required before cleaning/inspection. First clean then perform scan. Repeat if necessary.
|
- Perform a Scan (15min)
| Note—From Fusion-System tab, Initialize System.
(This minimizes TC heatsink bug) |
- PantherMain Background Scan = Pass
- Background Scan = Pass
- PEEK scan = Pass
- Perform either A or B
- Monitor next customer run to make sure cals and controls are valid.
- Paraflu
Click the  button at the top of the page to send feedback, comments, or change requests.