Fusion Reaction Tube Tray Shutters Removal and Replacement

|
Note—A Firmware Installation procedure must be performed when replacing a module or PCB. |
Parts and Materials Required
- Reaction Tube Tray Shutters
Time Required
- 30 Minutes
Removal Procedure
- Put on proper PPE.
- Power off the Panther System and PC.
 Free each shutter from the Eccentric Drive Pins. (The bottom shutter is connected to the front motor and the top shutter is connected to the rear motor. The view below is from the side, not the front.)
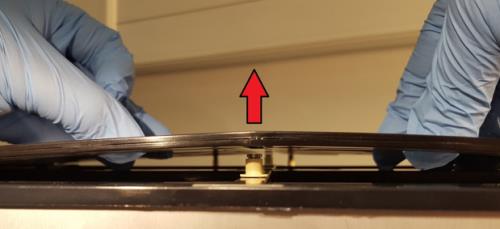
- Pull up on the middle of the shutters to clear the center Guide Pins.
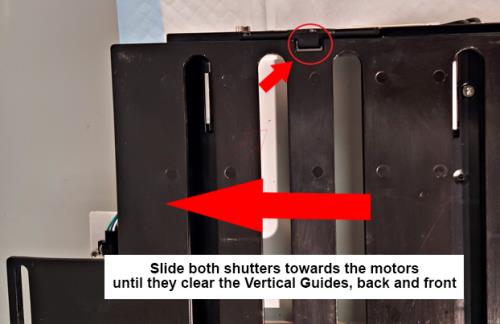
- Slide the shutters towards the motors to clear the Vertical Guides.
- Remove the shutters.

Replacement Procedure
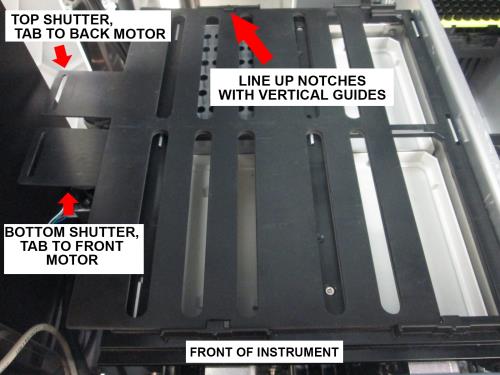
- Hold both shutters together above the drawer, with both tabs on the left. The top shutter should have its tab over the rear motor, and the bottom shutter should have its tab over the front motor.
- Line up the notches with the Vertical Guides.
- Slide both shutters under the Vertical Guides (front and back of drawer) on the left.
- While holding down the edges of the shutter, slightly raise the middle of the shutter above the center Guide Pins.
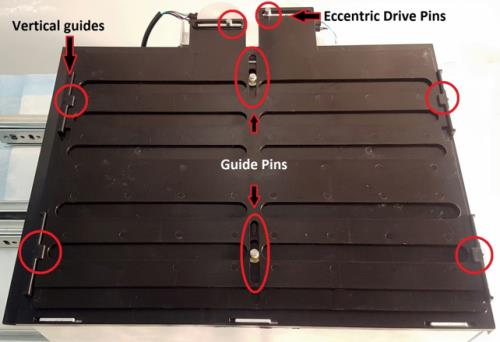
- Slide the shutter away from the motors, making sure both shutters slide under the other set of Vertical Guides on the right.
- Once the shutters are under all four Vertical Guides, lower the shutters so that the center Guide Pins are inside of the guide slots of the shutters.
- Place the Eccentric Drive Pins into the corresponding eccentric drive pin slot of each shutter.
- Visually confirm:
- Both Eccentric Drive Pins are in the Eccentric Drive Pin slots.
- The bottom shutter is connected to the motor closest to the front of the system.
- Both center Guide Pins are in the guide pin slots.
- Both shutters are under all four Vertical Guides of the drawer.
Verification
- Power on the Panther System and PC.
- Perform the Reaction Tube Tray Shutter Teaching procedure.
 button at the top of the page to send feedback, comments, or change requests.