Create a Access Hole for Tubing in the Waste Drawer.

|
Note— This procedure is ONLY for classic Panther Waste Drawers being upgraded into a PLUS Waste Drawer. Panther PLUS Full Waste Drawers ordered as spares will already have this access hole ready to use. You do NOT need to perform this procedure on a Panther PLUS Full Waste Drawer ordered as a spare. |
Procedure
- With the system powered off, open the Waste Drawer as far as possible.
- Safely remove and discard the solid waste.
- Remove the Waste Bottle, discard the liquid waste and set the bottle aside.
- Place absorbent pads over the Panther Chassis floor beneath the Waste Drawer and inside the Waste Drawer beneath the vacuum tubing.
- Place absorbent pads on the floor beneath the Panther Waste Drawer where the hole will be drilled.
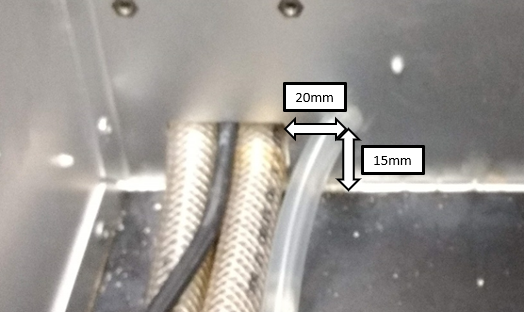
 Mark a point 15mm from the bottom of the Waste Drawer and 20mm from the right-side of the cutout for the vacuum tubing with a permanent marker.
- Set the step drill bit stop collar to drill a 1/2" hole.
- Apply a layer of lubricant to the step drill bit.
- Drill the hole to 1/2" on low-speed.

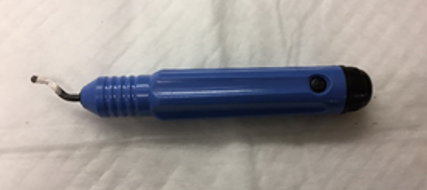
Caution—Be sure the drill is perpendicular to the surface being drilled so the drill bit does not drift. - Soften the sharp edges of the hole with a deburring tool.
Note—If needed, click this link to see how to use the deburring tool.
Use-a-Deburring-Tool - Carefully remove the absorbent pads that were inside the Panther system and Waste Drawer.
Caution—Do NOT allow the metal shavings on the absorbent pads to fall into the system. Clean up any metal shavings that remain inside. - Gather the absorbent pads that were placed beneath the Panther. Clean up all metal shavings remaining in the work area.
- Remove the remaining cutting oil from the cutting area with a lint-free wipe and alcohol.
- Proceed to Install Waste-to-Drain Bottle Straw Fitting in the Removable Waste Bottle
 button at the top of the page to send feedback, comments, or change requests.