Inspection and Repair Procedure for the Bleach Bottle Detection Sensor
Purpose
The purpose of this procedure is to provide service personnel with an inspection and repair procedure of all new bleach bottles for the Panther System. This procedure is intended to help address potential out-of-box failures due to a sensor/float detection issues that may be caused by a manufacturing error.
What is Affected
All newly installed bleach bottles should be inspected and repaired, if required, per this procedure.
The inspection and repair procedure is to be performed prior to installing a brand new bleach bottle on a Panther System or upon a bleach bottle failure due to not sensing the float. Generally, failure to detect/sense the float is a result of a misaligned/misassembled float guide. This causes the float to be too far from the wall of the bottle, exceeding the range of the sensor’s detection.
Parts and Materials Required
- Proper PPE
- M5 Allen Wrench
Time Required
- 25 Minutes
Procedure
Part A: Inspection
- Put on proper PPE.
- Remove the bottle from the bubble wrap.
- Unscrew the cap.
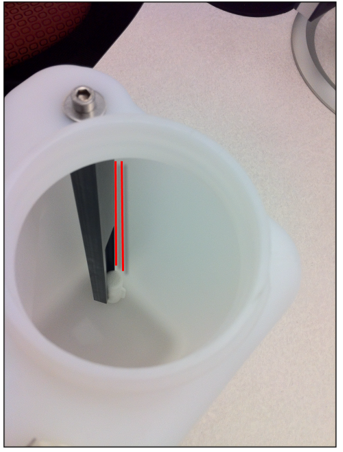
- Place the bottle on a flat surface where you can see the linear float sensor through the mouth of the bottle.
 Visually inspect the alignment of the linear float guide with the walls of the bottle.
- Ensure the proper orientation of the float guide.
- If the bottle fails inspection or if you are unsure continue to Part B: Repair.

Part B: Repair
- Remove the float guide from the bottle by unscrewing the M4 screw securing the float guide to the bottle.
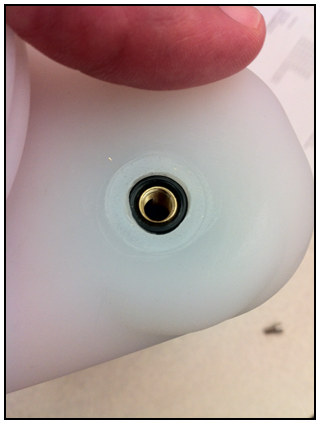
- Reinstall the float guide onto the bottle by ensuring that the float guide round insert, found at the top of the guide, is fully seated inside of the through-hole (float guide mounting hole) in the bottle, as shown 3 below.
- Secure the float guide to the bottle with the M4 screw that was removed in Step 1. While tightening the M4 screw, try to visually align the float guide with the adjacent wall of the bottle.

Note—Refer to Step 6 in Part A for proper orientation of the float guide. Also ensure that the float sensor is installed in the right orientation with the fins on the side of the float is located on the bottom as it slides along the guide. - Visually inspect the float guide, one more time, after securing it to the bottle (refer to Step 5 in Part A, above) and if it is still not aligned as recommended then repeat Steps 1 -3 until desired results are achieved.
- Fill the bottle with water or bleach to the recommended full level and place the bottle in the system. Use the Panther System software to test for bottle detection. If it fails then repeat Steps 1–4.
 button at the top of the page to send feedback, comments, or change requests.