Unlocking the PC BIOS on a Dell Optiplex XE2
Time Required
Procedure
- Shutdown the XE2 computer.
- Unplug the power cable.
- Wait 5 seconds and disconnect all external devices and network cables from the XE2 computer.
- Press and hold the Power button for 10 seconds while the XE2 computer is unplugged to release residual power supply voltage.
- Ground yourself by touching an unpainted metal surface that is ground before touching anything inside the XE2 computer.
- Remove the XE2 access panel.
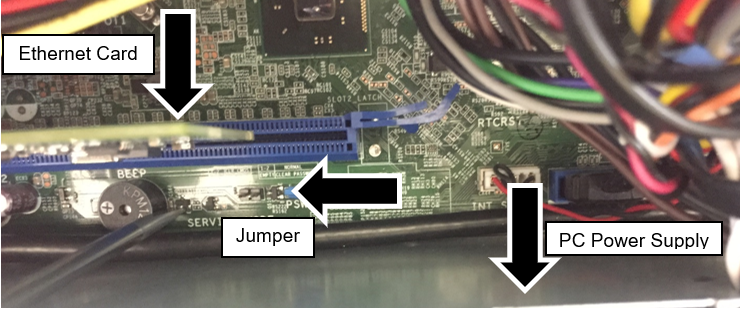
 Locate the password jumper on the motherboard. Look for the letters PWD, PSWD, or PSWDCLR. The jumper is located between the PC Power Supply and the Ethernet Card.
- Remove the jumper from the pins, replace the computer access panel, reconnect the power cable, and the monitor cable.
- Power on the XE2 computer.
- After the Windows login screen appears, turn off the computer.
- Disconnect the power cable and monitor cable.
- Press and hold the power button for 10 seconds to release residual power from the system.
- Remove the computer access panel and reinstall the jumper in its original position, covering the 2 pins. This will re-enable the BIOS password feature.
- Re-install the computer access panel.
- Reconnect the power cable, monitor cable, and all external devices.
- Power on the computer.
- You can now assign a new system and/or a setup password in the BIOS.
Click the  button at the top of the page to send feedback, comments, or change requests.