MagWash Aspiration Tubing Replacement Procedure
Parts and Materials Required
- Panther Tool Kit
- Aspiration Tubing (Set of 5)
Time Required
Diagnosis
- Systems that are covered by this procedure exhibit the following:
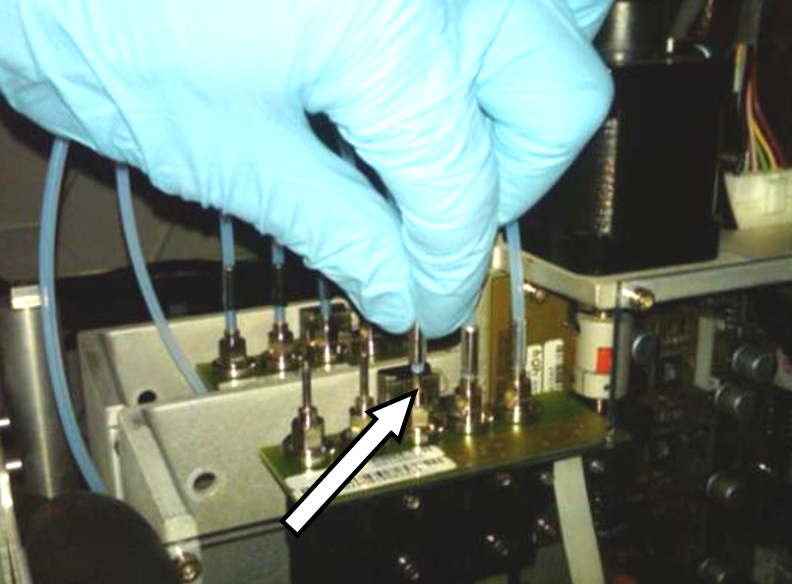
 The system has MagWash vacuum aspiration tubing held in place with black-oxide colored metal spring clips as shown below.
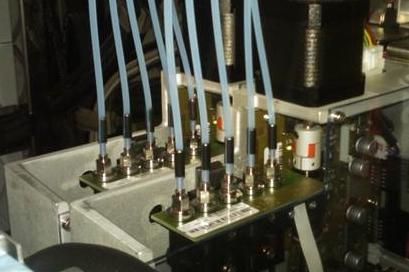
- The system has reported ML2 (MagWash Wash 1/2 wash buffer level too high) or ML5 (too much residual wash detected) flags, and investigation has eliminated clogged MagWash aspirators, a faulty Wash dispense pump or any other reason as a cause.
- They system has reported MagWash errors during prime and investigation has eliminated clogged MagWash aspirators, a faulty Wash dispense pump or any other reason as a cause.
- A visual inspection shows kinked or damaged tubing.
Procedure
| |

|
Note—Panther System power may remain on during this procedure; however, the system must be idle. |
| |

|
Warning—This procedure involves manipulating waste tubing that may contain contaminated material. Take extra care not to expose yourself or the system to contaminates that may be withing the waste tubing. |
- Put on proper PPE.
- Open the Left and Right Canopy Door.
- Remove the partition wall between the Sample Bay and the Tip Drawers.
- Place absorbent pads on top of the Sample Bay and Tip Drawers.
- Firmly grasp the metal spring pins holding the existing tubing onto the MagWash aspirator(s).
- Twist and pull upwards to remove the tubing.

- If the tubing cannot be easily removed from the aspirators, one may use a set of needle-nose pliers to help pull the spring-clip free.
| Note—Take care not to bend or crush the metal aspirator within the tubing during removal. |
- Once removed from the aspirators, take care not to allow any material to drip from the end of the tubing onto any part of the system.
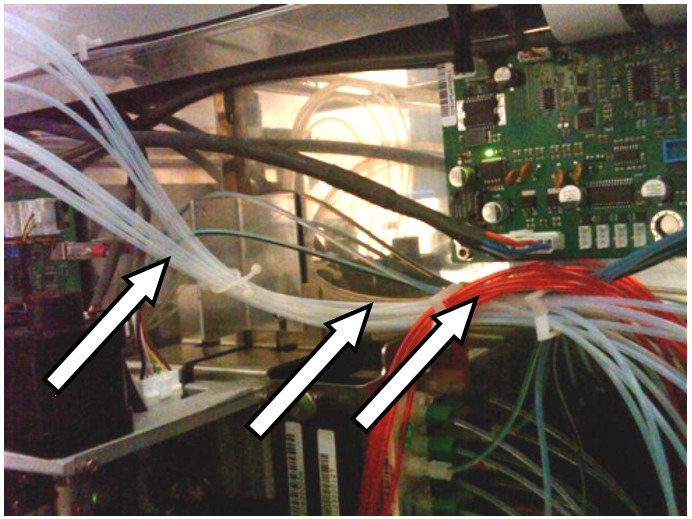
- Remove the aspirator tubes from the plastic retaining clips along the back of the system as shown below.
- Follow each of the tubes to the vacuum manifold and unscrew each one. Take care not to allow anything inside of the tubing to drip onto the system.
- Remove and dispose of the old tubing in a biohazard waste container.
- Obtain the new aspiration tubing set. Observe that:
- The aspiration tubing spring-clips should be silver in color.
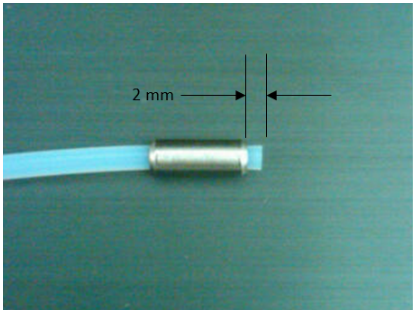
- That the spring clips should be pushed approximately 2 mm above the bottom end tubing. (see below)
- Install the new tubing by reversing the steps 5 through 10.
| Note—It is not important which port each tube is screwed into on the vacuum manifold. Each port experiences the same vacuum pressure. |
- Press the new tubing down, fully onto the MagWash aspirators until the tubing abuts the aspirator flange. Do NOT slide the spring clip in relation to the tubing.
- After seating the spring-clip, there should still be 2mm above the bottom of the tubing.
- Ensure that the new tubing is not tangled and will not interfere with the pipettor arms.
Verification
- In Service Software, perform a MagWash OQ Test.
- Click on the System tab.
- Select the Main 2 tab.
- Check the Report, Initialize, MagWash #1, and MagWash #2 boxes.
- Click on the Mag Wash OQ Test button.
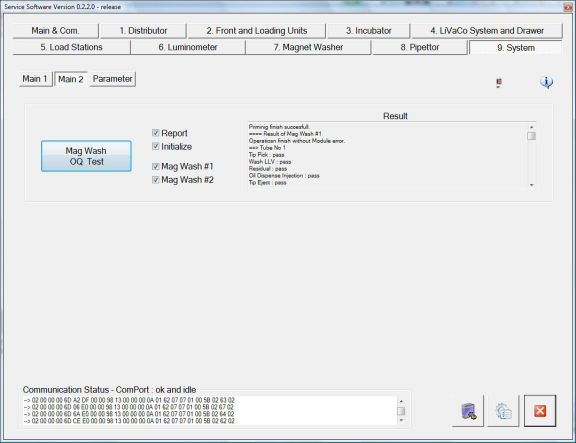
- Follow the on-screen prompts to complete the Mag Wash OQ Test.
| Note—Service Software 0.2.2.0 will always indicate that the Mag Wash OQ Test has failed. This is a software bug and will be updated in future Service Software revisions. |
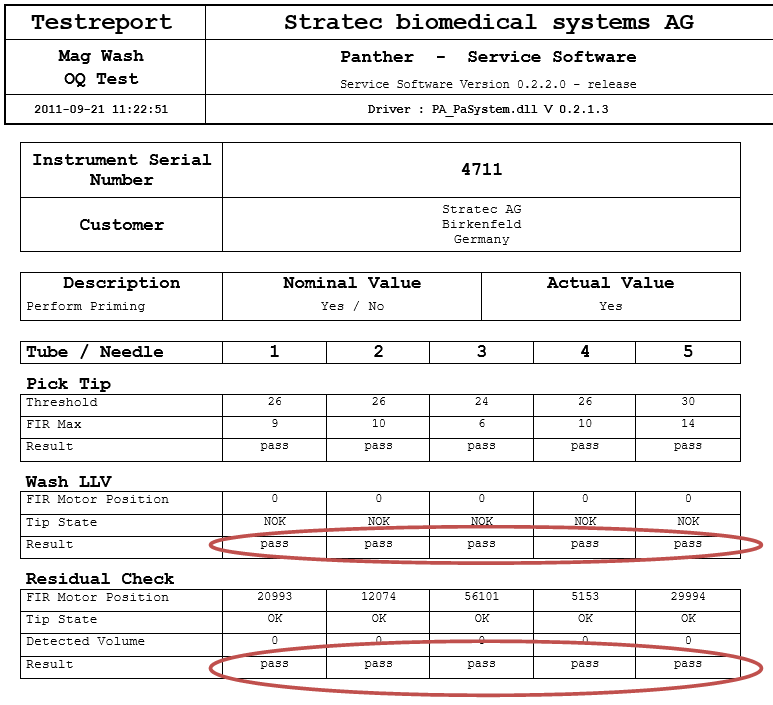
- Do not look at the overall test results. Instead look at the generated OQ test report. Inspect the test report and make sure that all Tubes/Needles pass for "Wash LLV" and "Residual Check".
- Inspect for any kinks or crushed tubing.
- Inspect for any leaks at the vacuum fittings.
- the system.
- The System should not report any MagWash or Wash Buffer erros.
Click the  button at the top of the page to send feedback, comments, or change requests.